Hai friends... I was not in touch with this blog for last few weeks since my university exams were going on... Lots of interesting things have happened on this small duration and one of the most important in this is the release of Ubuntu 11.10 the 'Oneric Ocelot'.
I have been using Oneric from their 2nd alpha release and found many things superb in this release...
One of the greatest change we first notice while going with ubuntu 11.10 is its new look for the login screen.(LightDM is the new login screen while the old one is GDM).. I loved the new look and made my first impression the best ... Congrats for Ubuntu for that.I hope most of the users have the same experience. :)
The next thing we will notice in new ubuntu is that it doesnot have Ubuntu classic, instead it provides unity 2D interface. As my laptop is old , Ubuntu unity is little lagging hence I went on with unity 2D and I am surprised that its also cool as Unity.. Wow!!.
So what are the things I have done done after Installing Ubuntu 11.10 in my computer.Thats what I would like share through this post.. Thanks to Techdrivein.com for an explained list of what all we have to do.. First of all we have to update the repositories and make sure all the updates are installed... Otherwise many of the interesting features in Ubuntu wont work.
UPDATE REPOSITORY
For that type update manager in unity dash and select it. click check and install all the updates.. Done (We can also do this alternatively by typing the following command in terminal which can be accessed using the shortcut key Alt+ctrl+T.
sudo apt-get update && sudo apt-get upgrade
UBUNTU RESTRICTED PACKAGES
After that Install Ubuntu -Restricted packages. Otherwise You wont be able to listen to music or watch movies.. One method is to click a mp3 or videofile and Ubuntu will show the missing packages and just update it from it. Now the other more efficient way is to go to terminal and type
sudo apt-get install ubuntu-restricted-extras
Or if you dont like command interface (if it feels like geeky) dont worry...Ubuntu provides you an alternate way. take synaptic package manager (search in unity dash) and type ubuntu-restricted-extras, click on the box on the left side and click mark for installation and apply from the top panel.. Done
Enable Full DVD Playback(Dual Layer DVD Support)
Installing Ubuntu -Restricted packages package will pull in support for MP3 playback and decoding,support for various other audio formats (GStreamer plugins), Microsoft fonts,Java runtime environment, Flash plugin, LAME (to create compressed audio
files), and DVD playback.But this does not install libdvdcss2, and will not let you play
encrypted DVDs such as Dual Layer DVDs.
 sudo wget --output-document=/etc/apt/sources.list.d/medibuntu.list http://www.medibuntu.org/sources.list.d/$(lsb_release -cs).list && sudo apt-get --quiet update && sudo apt-get --yes --quiet --allow-unauthenticated install medibuntu-keyring && sudo apt-get --quiet update
sudo apt-get install libdvdcss2
You can also install this using Synaptic package manager. But U have to update your source list. For that take settings -> Repositories-> other software. But i prefer you use the Terminal method which is more easy.. Sometimes Geeky methods are more easier than that of grapphical interface.
Check for Availability of Proprietary Hardware Drivers
Now you have to download the drivers for the graphic card, wireless LAN , bluetooth etc on the system...Most properly drivers for this will be available in Additional Drivers which can be accessed from unity dash board.. Update all the drivers in the list.. Sometimes drivers for your system may not be available in Additional Drivers. In such cases I am sorry to inform that you have to swim deeply inside ubuntuforums which almost solve any problems related to ubuntu...
(image from techdrive.in)
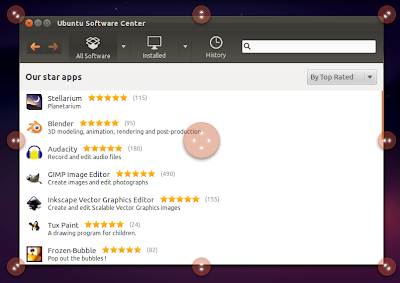
Install Compiz Config Settings Manager
Compiz brings the beautification effects for your desktop and is a very good tool to surprise your friends who are new to Ubuntu.. This compiz package has helped me to make my friends use Linux...If you never used Compiz, its better you try out its magic..
To install this, just search compiz config manager in Ubuntu software centre..
Also install all compiz plugin extra and compiz fusion plugin extra packages using synaptic package manager. You can also install Coompiz config settings manager using terminal by
sudo apt-get install compizconfig-settings-manager
You can get compiz config settings manager by seaching CCSM in unity dashboard.Just experiment on it.
- You can increase/decrease the size of launcher icons in the unity plugin-> experimental tab in ccsm
- you can also change the transparency of unity panel in unity plugin-> experimental
- You can increase the number of dektops by general options-> desktop size in ccsm
- You can give animations to opening and closing windows, menus, popup menus etc from animations under effects in ccsm
Also try the water effect, wobly effect.. i effects menu.
Add Your Favorite Places as Quicklists for Home Icon in Unity
- Copy 'Home Folder' launcher file to your home directory. For that,
you need to open Terminal(Unity Shortcut: Ctrl + Alt + T) and copy-paste
the following commands.
cp /usr/share/applications/nautilus-home.desktop ~/.local/share/applications
- Open the file in your favorite text editor. I am using vi editor here.
sudo vi ~/.local/share/applications/nautilus-home.desktop
- Now replace the content of the file with the following text.
[Desktop Entry]

Name=Home Folder
Comment=Open your personal folder
TryExec=nautilus
Exec=nautilus --no-desktop
Icon=user-home
Terminal=false
StartupNotify=true
Type=Application
Categories=GNOME;GTK;Core;
OnlyShowIn=GNOME;Unity;
X-GNOME-Bugzilla-Bugzilla=GNOME
X-GNOME-Bugzilla-Product=nautilus
X-GNOME-Bugzilla-Component=general
X-Ubuntu-Gettext-Domain=nautilus

X-Ayatana-Desktop-Shortcuts=Videos;Documents;Music;Pictures;Downloads
[Videos Shortcut Group]
Name=Videos
Exec=nautilus Videos
TargetEnvironment=Unity


[Documents Shortcut Group]
Name=Documents
Exec=nautilus Documents
TargetEnvironment=Unity

[Music Shortcut Group]
Name=Music
Exec=nautilus Music
TargetEnvironment=Unity

[Pictures Shortcut Group]
Name=Pictures
Exec=nautilus Pictures
TargetEnvironment=Unity

[Downloads Shortcut Group]
Name=Downloads
Exec=nautilus Downloads
TargetEnvironment=Unity
- And restart Unity. Hit Alt + F2 and run the following command to restart Unity.
unity --replace
- Done. If that doesn't work, you might need to log out and log back in to restart Unity.
Enable Unity Grab Handles
Unity grab handles are a easy and eyecandy way of resizing windows,
better suited for touch screen devices though.
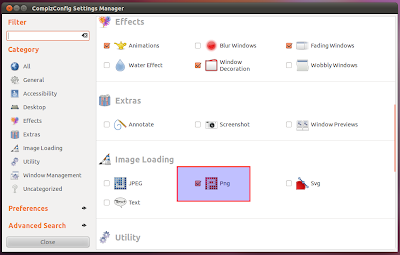
- Launch CCSM(just search for CCSM in Unity Dash).
- Make sure that the category Png(highlighted above) is ticked.
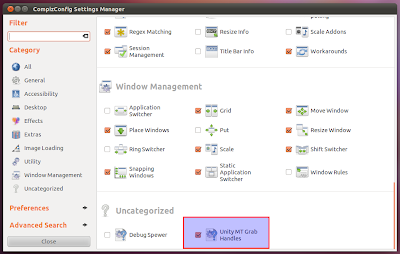
- In the Uncategorized section at the bottom of CCSM, make sure that Unity MT Grab Handles is ticked as well. Click on Unity MT Grab Handles option now.
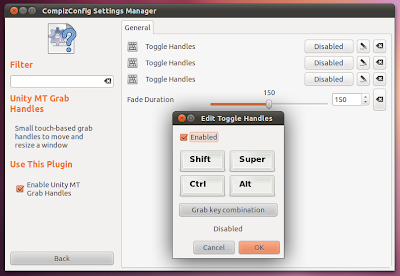
- You will see that the Toggle Handles option is Disabled by default. Click on the Disabled button and tick the resulting Enabled box.
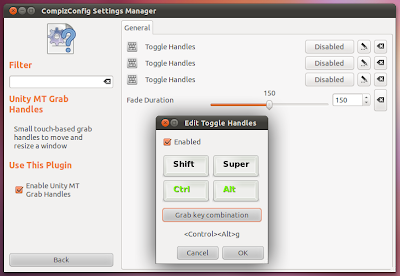
- Hit Grab key combination button and select the shortcut you want. As
you can see in the screenshot above, Control + Alt + g was my choice.
Its up to you.
- Done. Unity Grab Handles are enabled in Ubuntu 11.10 successfully.
SYSAPPLICATIONS ON THE UNITY TOP PANEL
U would have noticed that Unity Top panel is locked down so that U cant add any more applications in that..
type the following in the terminal
sudo apt-get install indicator-weather
- Dropbox application Indicator
how to install
: http://www.techdrivein.com/2010/09/how-to-install-dropbox-in-ubuntu-lucid.html
Paste the following in Terminal
sudo add-apt-repository ppa:alexeftimie/ppa
sudo apt-get update
sudo apt-get install indicator-sysmonitor
Do the following in Terminal to install System Load Indicator
sudo add-apt-repository ppa:indicator-multiload/stable-daily
sudo apt-get update
sudo apt-get install indicator-multiload
Done. And simply
launch System Load Indicator from Unity dash. Eventhough System Load
Indicator app is equally good, I prefer Sysmonitor Indicator for its
simplicity.
sudo add-apt-repository ppa:atareao/atareao
sudo apt-get update
sudo apt-get install touchpad-indicator
Done. Now, once you disable your touchpad, you can access top panel by simply hitting F10 key.
sudo add-apt-repository ppa:geod/ppa-geod
sudo apt-get update
sudo apt-get install indicator-workspaces
- Keylock Application Indicator
sudo add-apt-repository ppa:tsbarnes/indicator-keylock
sudo apt-get update
sudo apt-get install indicator-keylock
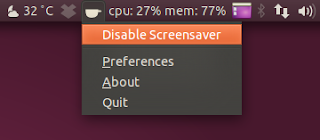
- Caffeine Application Indicator
Caffeine
is a very useful application application that can temporarily prevent
the activation of both the screensaver and the "sleep" powersaving mode.
There is even an option to activate Caffeine when specific applications
are launched. Do the following in Terminal to install Caffeine in Ubuntu 11.04.
sudo add-apt-repository ppa:caffeine-developers/ppa
sudo apt-get update
sudo apt-get install caffeine
Done. Simply launch Caffeine from Unity dash.
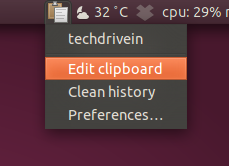
- Pastie Clipboard Manager Indicator
Pastie is a simple clipboard manager. Do the following in Terminal to install Pasite indicator in Ubuntu 11.04 Natty Narwhal.
sudo add-apt-repository ppa:hel-sheep/pastie
sudo apt-get update
sudo apt-get install pastie
Done. Launch Pastie clipboard manager from Unity applications dash.
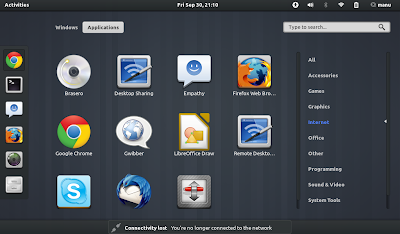
Install GNOME Shell in Ubuntu
Just
search for 'GNOME Shell' in Software Center OR do the following in
Terminal.
sudo apt-get install gnome-shell

 Almost more 50% percent of the internet users in our country will surely have an account in the world's one of the most popular social networking site facebook.com.. Even many of us will be using INternet only for surfing in Facebook... Actually I have found many of my friends activate GPRS plans in their mobile just to make them always updated in facebook.. Thats the reason why I write this post... This post is dedicated to all those my loving facebook addict friends...